Let’s start, I want to begin by explaining my motivation on working on this idea of porting a SAM3 model to mlx, to run on a mac.
- To understand multi modal models and how different modalities, like images, text, boxes, can interact with each other to produce representations that are useful
- To understand ways in which we can improve and benefit from running models on-device
- To understand mlx and how with it’s lazy execution and unified memory architecture makes it very feasible to run models on a consumer hardware
This is one step in that direction where I’m trying to generally understand mlx and on-device models as I keep working on models of this kind. This blog mostly focuses on SAM3
Reading SAM3
It's a lot bigger system than what I was considering and I was considering only 1 component of a big system, but I kept a hard deadline to understand as much as possible, if not I will be drifting away with each different idea that I come across for a week and not finish anything.
I focused only on the image processing component of SAM3 by mostly ignoring what they did with their data curation process, training recipe, video tracking architecture etc. During this I encountered a bunch of different ideas which spans research from a lot of interesting papers. Identifying what I need to focus on to finish this by time was the biggest challenge with this task.
Once I found out the components that I need to work on by looking at different diagrams, descriptions in paper and glancing at the code, I decided I had to approach everything independently. I decided to code and test every component/model independently, in the process learning about some quirks in mlx and understanding each component as deeply as possible. As usual, I spent a lot of time on components which I thought looked very simple on first look, but turned out more intricate, like DETR-Decoder.
Components that make SAM3 Image
What I will be discussing here will be a very high level overview of some of the ideas that I found/learned while I was going through the paper and implementation. Mind you this is my first time working on a grounding model alone and I’m right now working on a model which does instance segmentation, semantic segmentation, boxes etc one shot. There’s a lot more intricate details both in implementation and ideas which I’m missing here.
Vision Language Backbone
There’s a new CLIP style model that meta recently release called Perception Encoder Core which aligns both text and image[1]. The Vision backbone is then used once per image to obtain features which are then used for downstream tasks to quickly iterate, by using text+exemplars, with other components which are fairly smaller and hence quick. Also checkout a whole range of new “perception models” dropped by meta for a Image, Video, Audio, Language, Spatial [2].

Windowed Attention: In the vision backbone they use windowed attention in 28 of the 32 layer deep transformer blocks and the rest had global attn blocks. In a sequence of shape BxHxWxC, in regular attention we split at Channels(C) to obtain heads, but in windowed attention we split at H and W, what this implies is that neighbors within the windows are attending to each other and not every patch to every patch, which is what happens in global attention[3].
Rotary Positional Encoding by fixing a Bug: They use rotary positional embeddings but referring to this other idea where they found a big bug when using windowed attention regular rope doesn’t make it work well with higher resolutions than what it was trained with, so they modify it in a simple way to obtain these embeddings that are scaled within each windows[4].
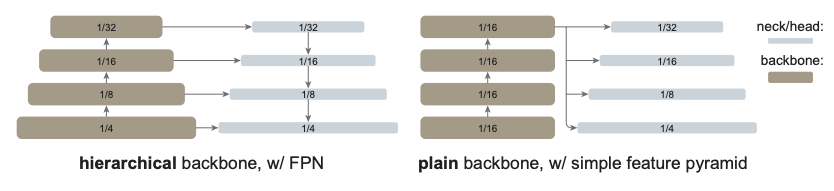
Obtaining MultiScale Features using a Simple Feature Pyramid Network called Neck: When using convolutional neural networks as backbones it was easier to obtain features of resolutions higher to lower which aids object detection, but using transformer backbone we’re essentially traversing through the network from beginning to end on same resolution, this paper suggests, building a neck which takes in this final representation and using a simple convolution built features of different resolution by upscaling or convolutions to be used for downstream object detection tasks[5].
Geometry Encoder
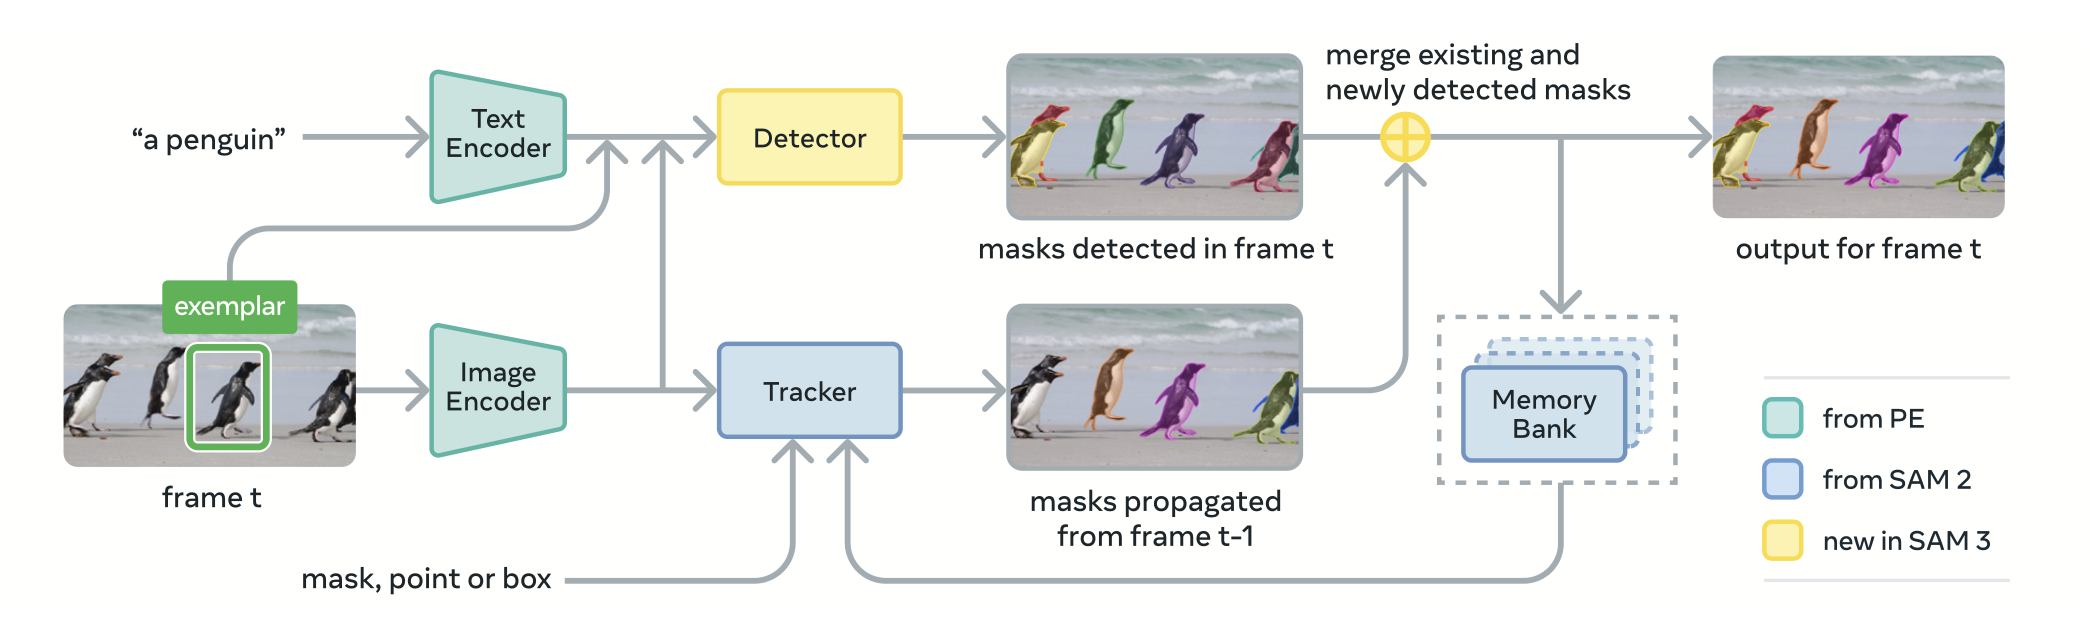
This component is used to encode points, boxes and masks for both Promptable Concept Segmentation (PCS), Promptable Visual Segmentation (PVS) tasks. Okay this is interesting, There are two tasks PCS and PVS, SAM2 was doing PVS and has the same Geometry Encoder component to encode points boxes and masks, but the difference, let’s say when using boxes, in SAM2 and SAM3 is that with SAM2 only the object within the selected box is segmented where as with SAM3 using a box now becomes an exemplar prompt which means the underlying concept within the box anywhere in the image is highlighted. For eg. If you drew a box on a dog in an image with 5 dogs, only that particular dog is segmented in SAM2 whereas all 5 dogs are segmented in SAM3
So here I focused on the task PCS only, so the boxes, if added, will act as exemplar prompts along with or without the text prompts to define concept.
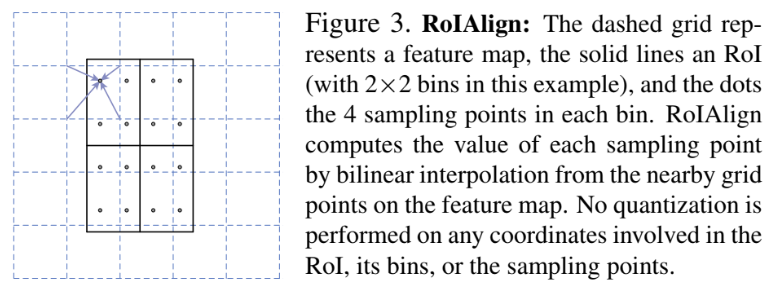
If you look at the visual features from the backbone being used along with the box prompts to encode the geometric prompt, one of the interesting thing they are doing here is called roi align, so simply what we do is since boxes as prompts will be of different sizes, to make them let’s say of same size of 7x7, we sample within the given box coordinates, 7x7 = 49 evenly space values in a grid of continuous space using bilinear interpolation from the feature map, in this case, of shape 72 x 72[6].
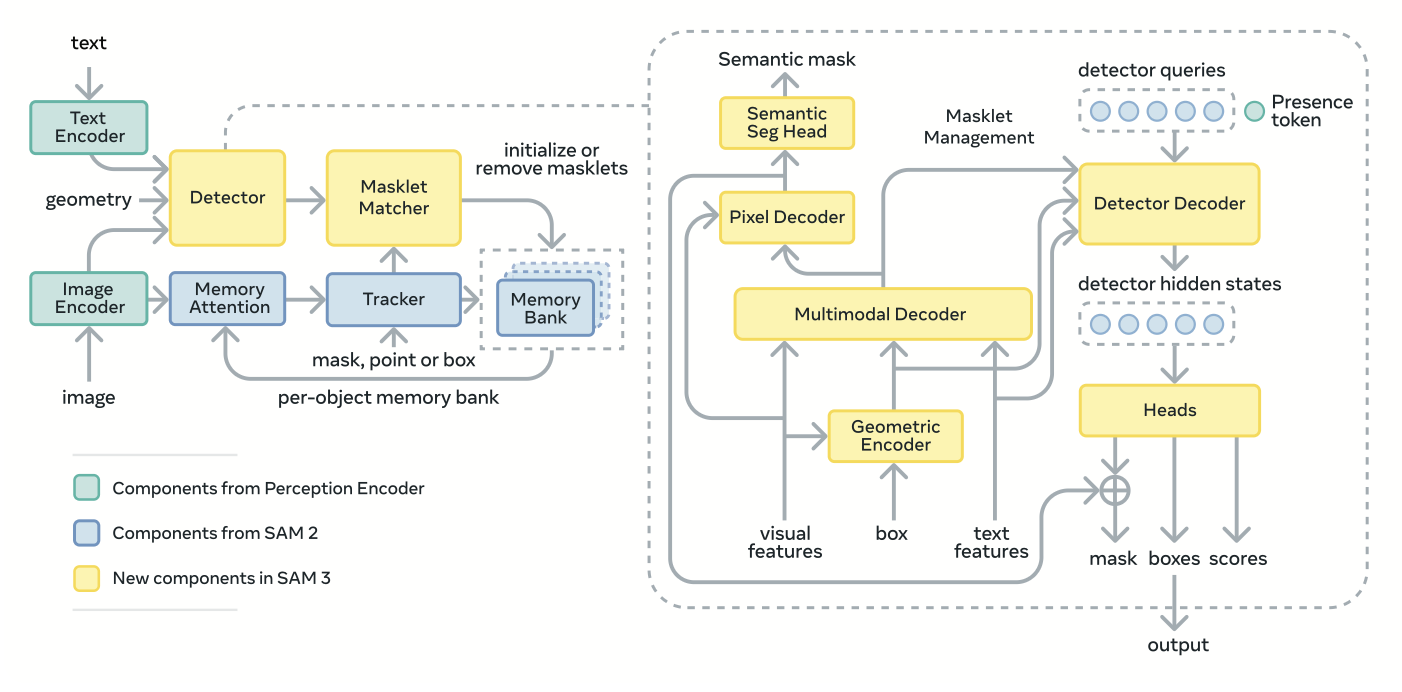
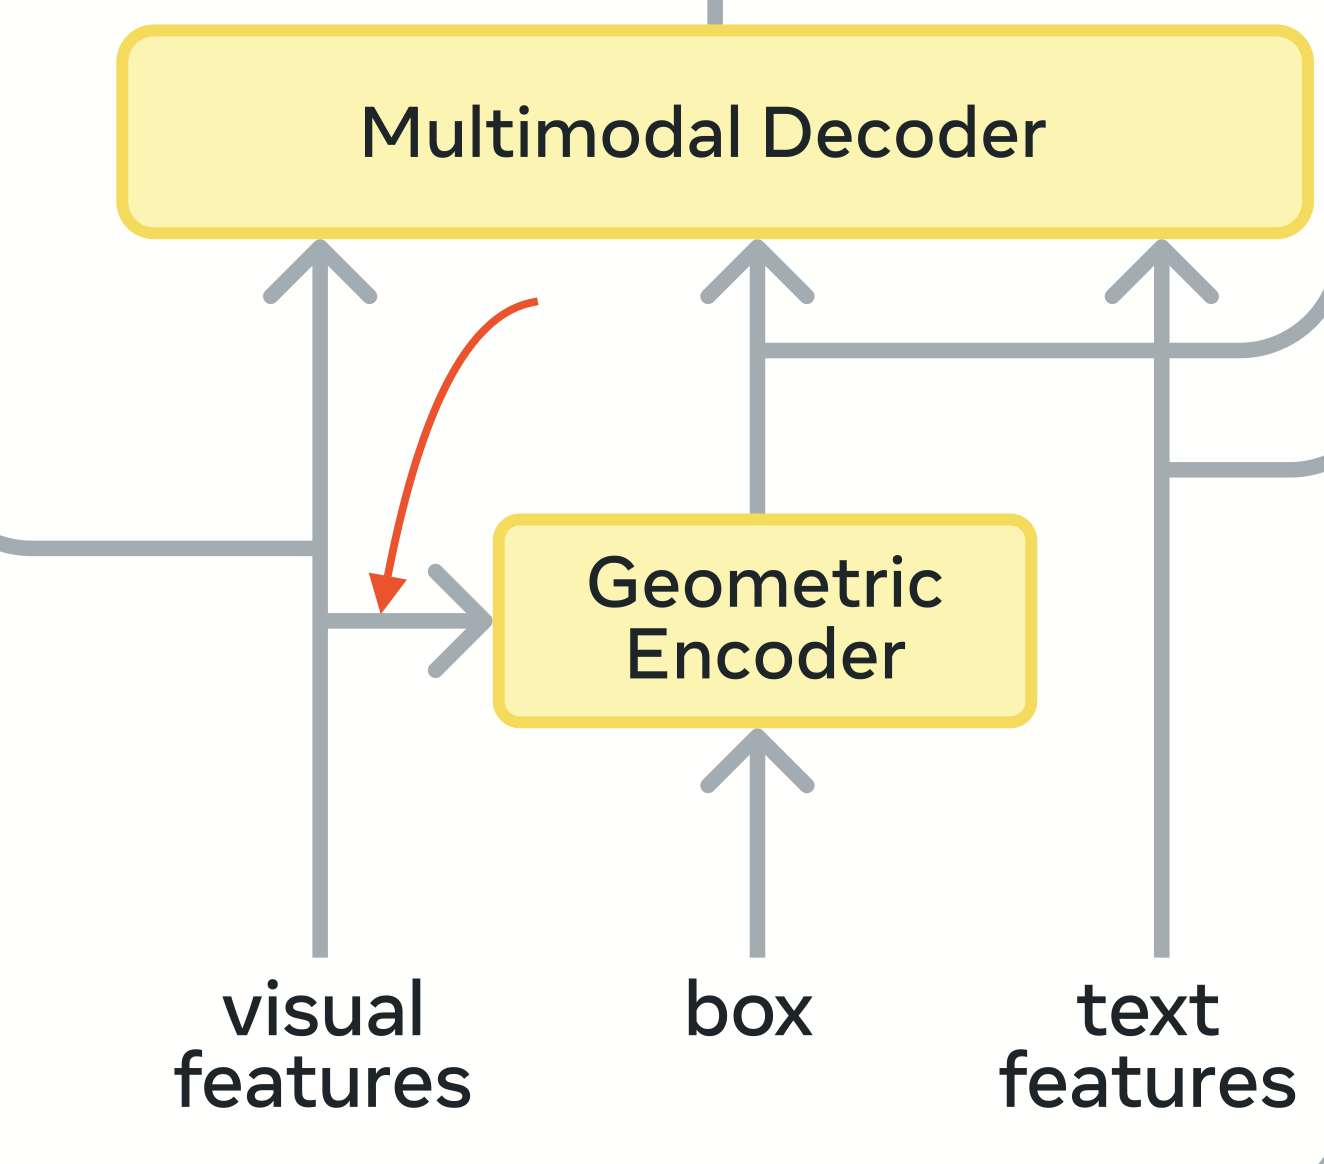
Transformer Fusion Encoder -> Multimodal Decoder in the Image
Now, Text and Geometry Tokens together constitute the prompt tokens. The goal of this component is to fuse information from prompts into image embeddings from the vision backbone, essentially using self attention and cross attention to condition prompt tokens on the unconditioned embeddings to convert them into conditioned image embeddings
Transformer DETR Decoder
This is the component where I spent the most time, this is the model that produces query embeddings that are later used to produce different masks, bounding boxes and scores.
For BOXES → Building upon the original DETR, I find these two ideas very interesting from the current implementation
- Using output from the Query Embeddings to calculate the actual boxes but using reference boxes as learnable parameters to start from and then iteratively refine during inference produces better results^[Deformable DETR](https://arxiv.org/pdf/2010.04159).
- Relative Positional Bias → To let the model focus closer to where the box is actually looking, higher bias where the box is looking, lower elsewhere[7].
Dot product scoring → FOR SCORES: For producing scores for each of the 200 queries we take in query embeds from the transformer DETR decoder and a mean pool over all tokens for the prompt and do a dot product 200 x 256 @ 256 x 1 to produce 200 scores for each query for that prompt.
Segmentation Head
Used to produce Instance Segmentation masks and semantic segmentation mask for the prompt (text+exemplar) adapted from MaskFormer[8].
We primarily operate with 72x72 resolution feature map from the backbone, using the FPN we spoke about above we also have, from upscaling this 72x72 features, multi scale features of resolution 288, 144 and 72.
First, we obtain pixel embeds, so there are 3 scales of features 72x72, 144x144 and 288x288 and the conditioned image features are of scale 72x72. Then we upscale the 72 res feature maps to 144, and add with 144 scale, upscale to 288 and add with 288, which is called Pixel Decoder in the image, to get a single feature_map of 288x288 which we use later.
For INSTANCE SEGMENTATION we use this 288 scale feature map and use each of the 200 object queries using matrix multiplication get the logits for the instance segmentation for each object query of resolution 288 x 288
For SEMANTIC SEGMENTATION, we use a conv layer to project it 256 channels it is in here, to a single channel of 288x288 resolution
Both instance segmentation masks and semantic segmentation masks are upscaled to image resolution using bilinear interpolation to get masks on the image
SAM3 Image Model Class
This is the wrapper that contains all the above components, calculates the image feats from the backbone once the image is uploaded, Now as the prompts keep changing (exemplar+/text) we run the steps sequentially to generate masks, scores, boxes
- Encode Prompts
- Run Transformer Fusion Encoder
- Run Transformer DETR Decoder
- Run Dot Prod Scoring + Maskformer Segmentation Head
While I was working on all this I only focused running a simple forward method by just extracting the shapes and types from the torch’s version and creating these random arrays and running through different important methods within these components, and also load weights for the particular component by converting conv layers, transformer layers and focusing on each component on it’s own.
Combing the Whole Model
Now while combining the whole model and running it, I had issues in places. I was able to load the parameters across all the different components very easily. Comparing the same images between running torch code and mlx code, I had difficulty figuring out first the preprocessing stage, the images were not the same and I didn’t want to risk the whole system on making the preprocessing correct, so I decided I will use the torch’s version which will make it so that the inputs going into the model are both the same and will figure out the pre processing later.
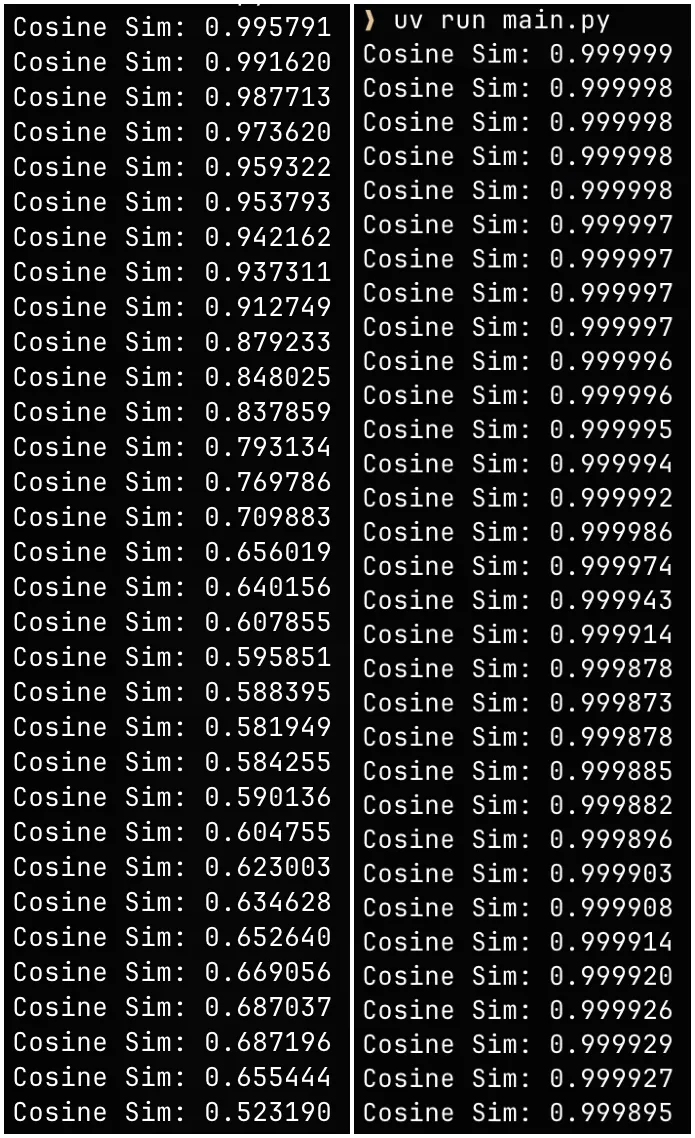
With Vision Backbone I had this problem where, the first metric I was measuring was the mean of the tensors/arrays (since they were on different machines, I couldn’t check the difference) as they are going through each transformer block and at each step I was looking if they were closer to about a difference of about < 1e-5, but the first thing I found was with every transformer block the outputs were slowly drifting away, so I downloaded these tensors from torch and compared it the cosine similarity of the outputs from the mlx implementation on my mac, I knew right away this was due to some minor norm layers or positional encoders, it was not norm layers i was careful with that but it was with rotary positional encoding, so I had to debug a lot and found out that I made a mistake in replicating viewasreal method from torch into mlx and boom, the outputs were beautifully similar the cosine similarities were all above 0.9999 and the differences less than 1e-5.
I had to make a lot of debugging again which is not very interesting but there were also some operations which are available in torch ops which are not available in mlx so I had borrowed some code of not very efficient implementation of roi align from torchvision to make it work in mlx[9] and I found grid_sample kernel implementation from github on mlx[10].
Now the outputs started matching the torch’s version, I compared across different prompts, images, boxes, and I compared the scores, boxes and masks.
I was now still using the torch’s transform’s for pre processing the image, for the preprocessing the default for torchvision’s resize operation has antialias true as default, I didn’t realize this and I was using the PIL Image’s resize operation and using BILINEAR but the outputs from the model was not very close, so after speaking with ChatGPT it made me experiment with LANCZOS and it was a lot closer to the torch’s input. Now all the outputs are very close for same prompts and image.
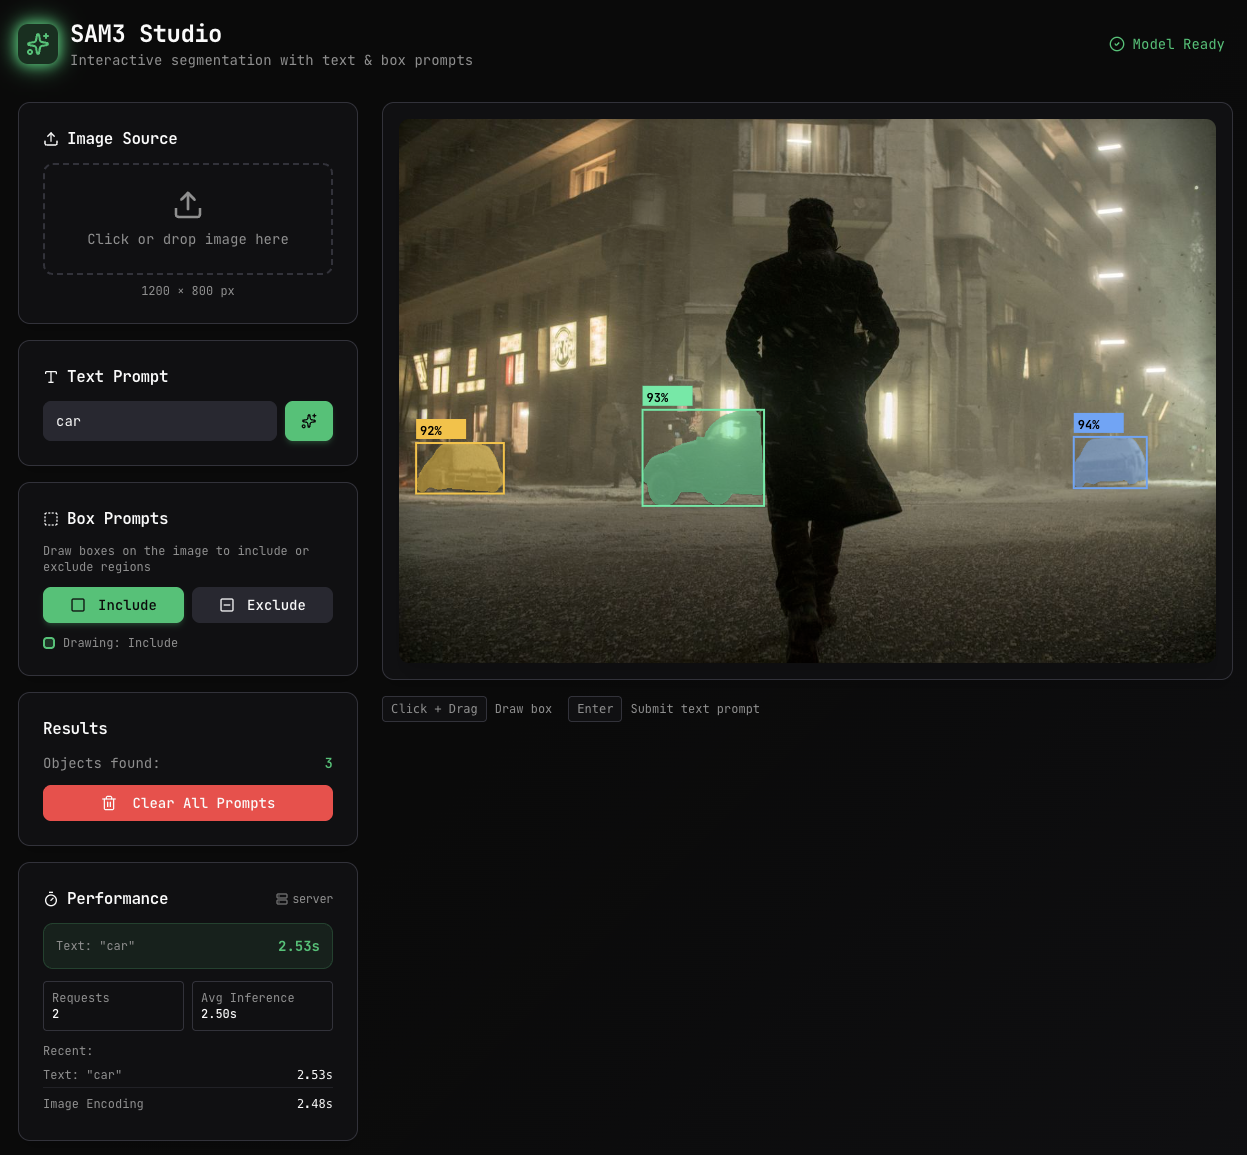
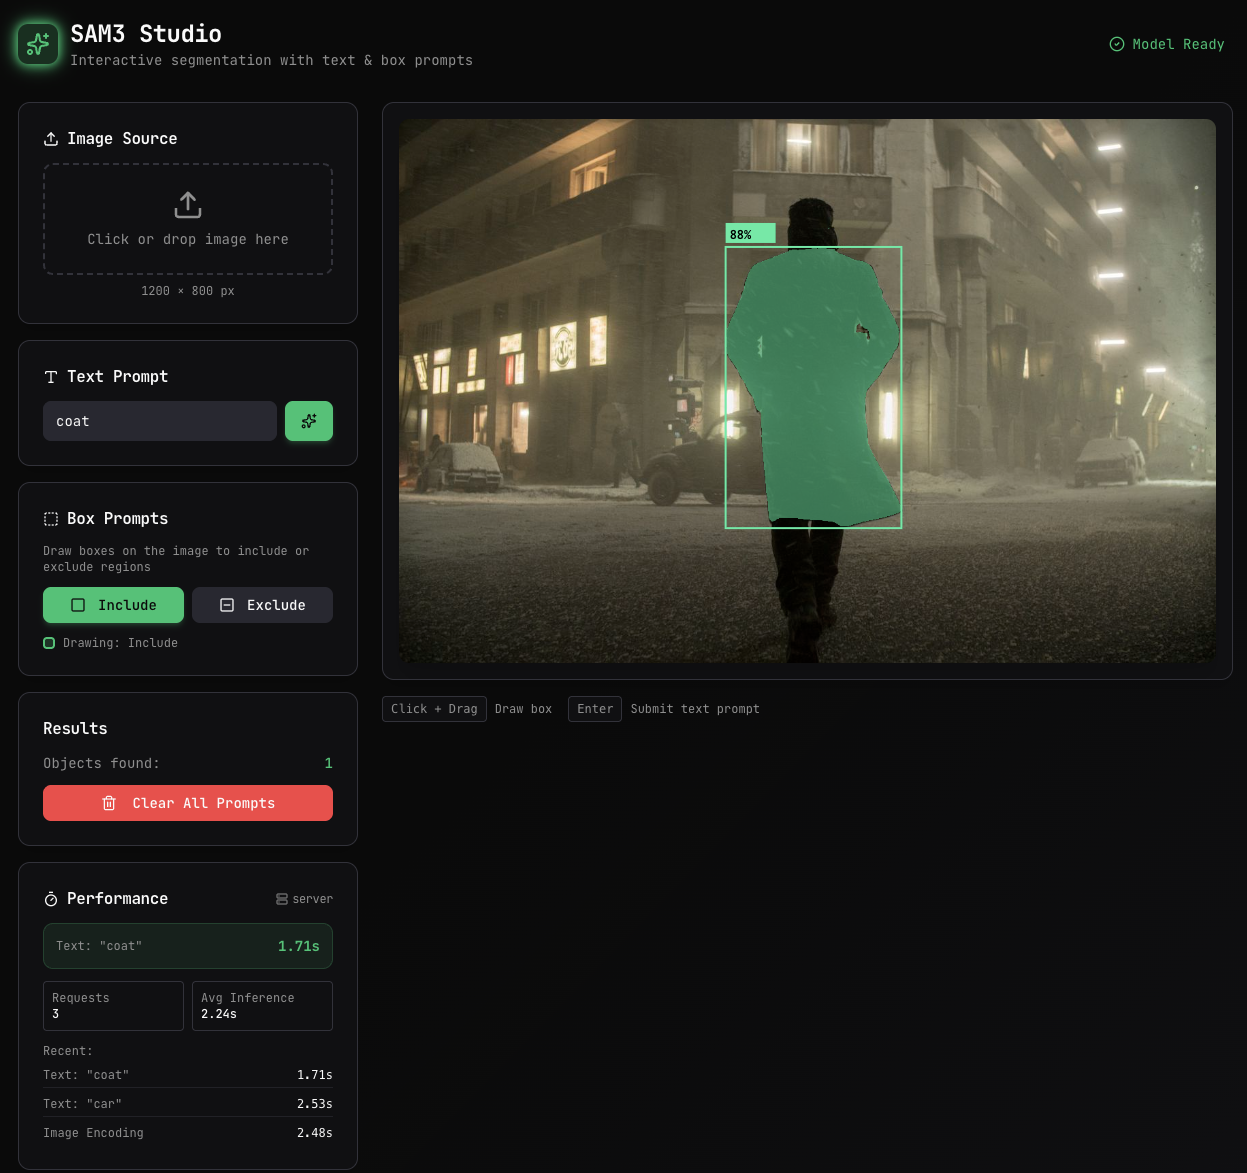
Application to Look at the Model Running On-Device
The main goal for me in building this is to see the inference speed of the model by actually using it as an application, so with the help of claude-opus-4.5 on cursor I built this in less than half a day which could’ve probably taken me 3 to 4 days to do some, but I for sure lost on some learning, but I told myself this is not the goal. But initially claude implemented a naive full mask on the backened to serialize and deserialize on the frontend and when I looked up on google, I came across the RLE method to encode and decode masks which is a lot more data efficient, the response was way quicker.
Conclusion
This project started from the excitement of looking at SAM3 model being demoed on X and a desire to understand it’s internals rising because of a naive understanding I had before, of deep neural networks and transformers. I quickly realized by looking at the model size that it was not so massive and I could run it on my mac if only someone, or I, had ported it to mlx, but the goal was always to learn why it works.
Some of the biggest lessons I was reinforced through this process now was how large architectural mistakes are very easy to detect. These subtle differences in rope encodings, norm layers, tensor reshaping, antialiasing could add up and doesn’t make sense anymore. They don’t fail loudly and only manifest as a mystery with the model output.
Working with MLX force me to think differently about execution and performance. It’s lazy execution meant that profiling without explicitly calling mx.eval() led to misleading conclusions about the time being spent computing. There were some other quirks like NHWC being the shape both the kernels and inputs are being operated on in MLX compared to NCHW in torch, on top of that, a lot of different operations that are available optimized in torch are not available yet in mlx. But the mlx team is working very hard, every issue I had, I almost certainly had an answer from someone in Github discussions from their repositories.
Even though this model runs on-device, I did not yet explore deeper on-device optimization techniques. I will later explore quantization, pruning, LoRA/QLoRA, distillation, Mixture of Experts etc using mlx to make the best of the constraints on-device.
I would like to keep extending this understanding of different modalities through my work, keep an eye on learning more about constraints and how to resolve them.
Something interesting
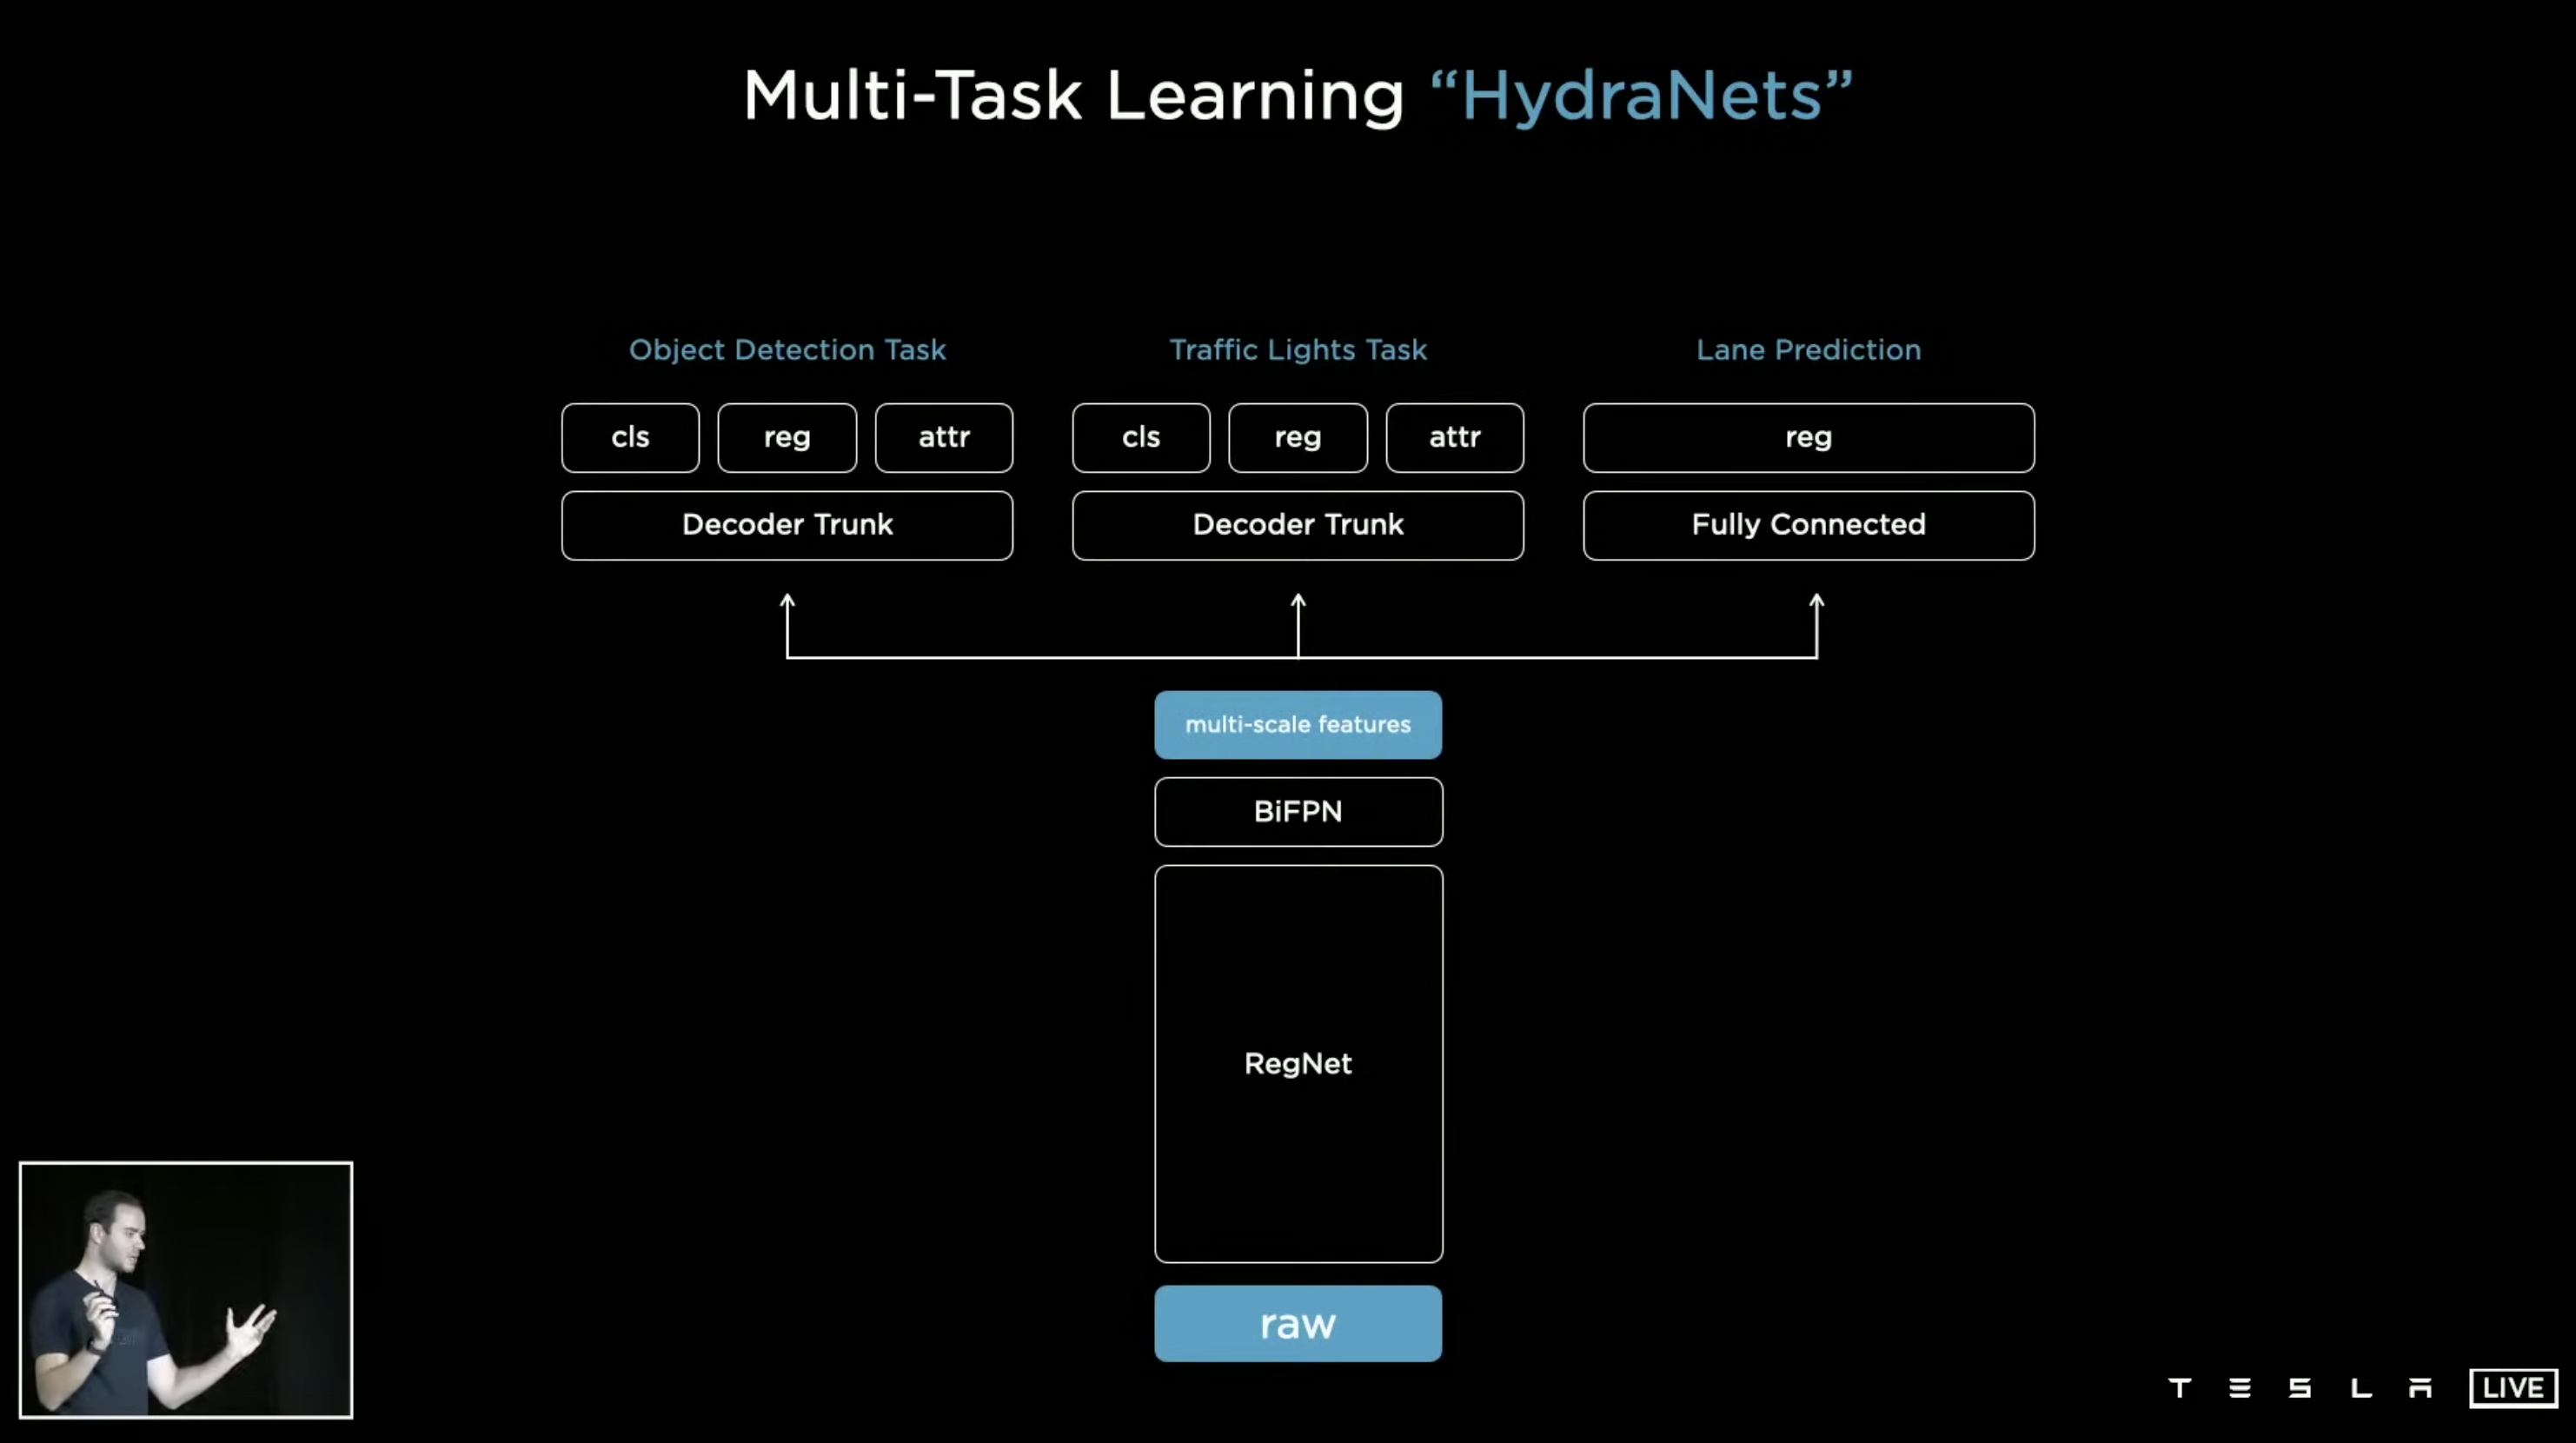
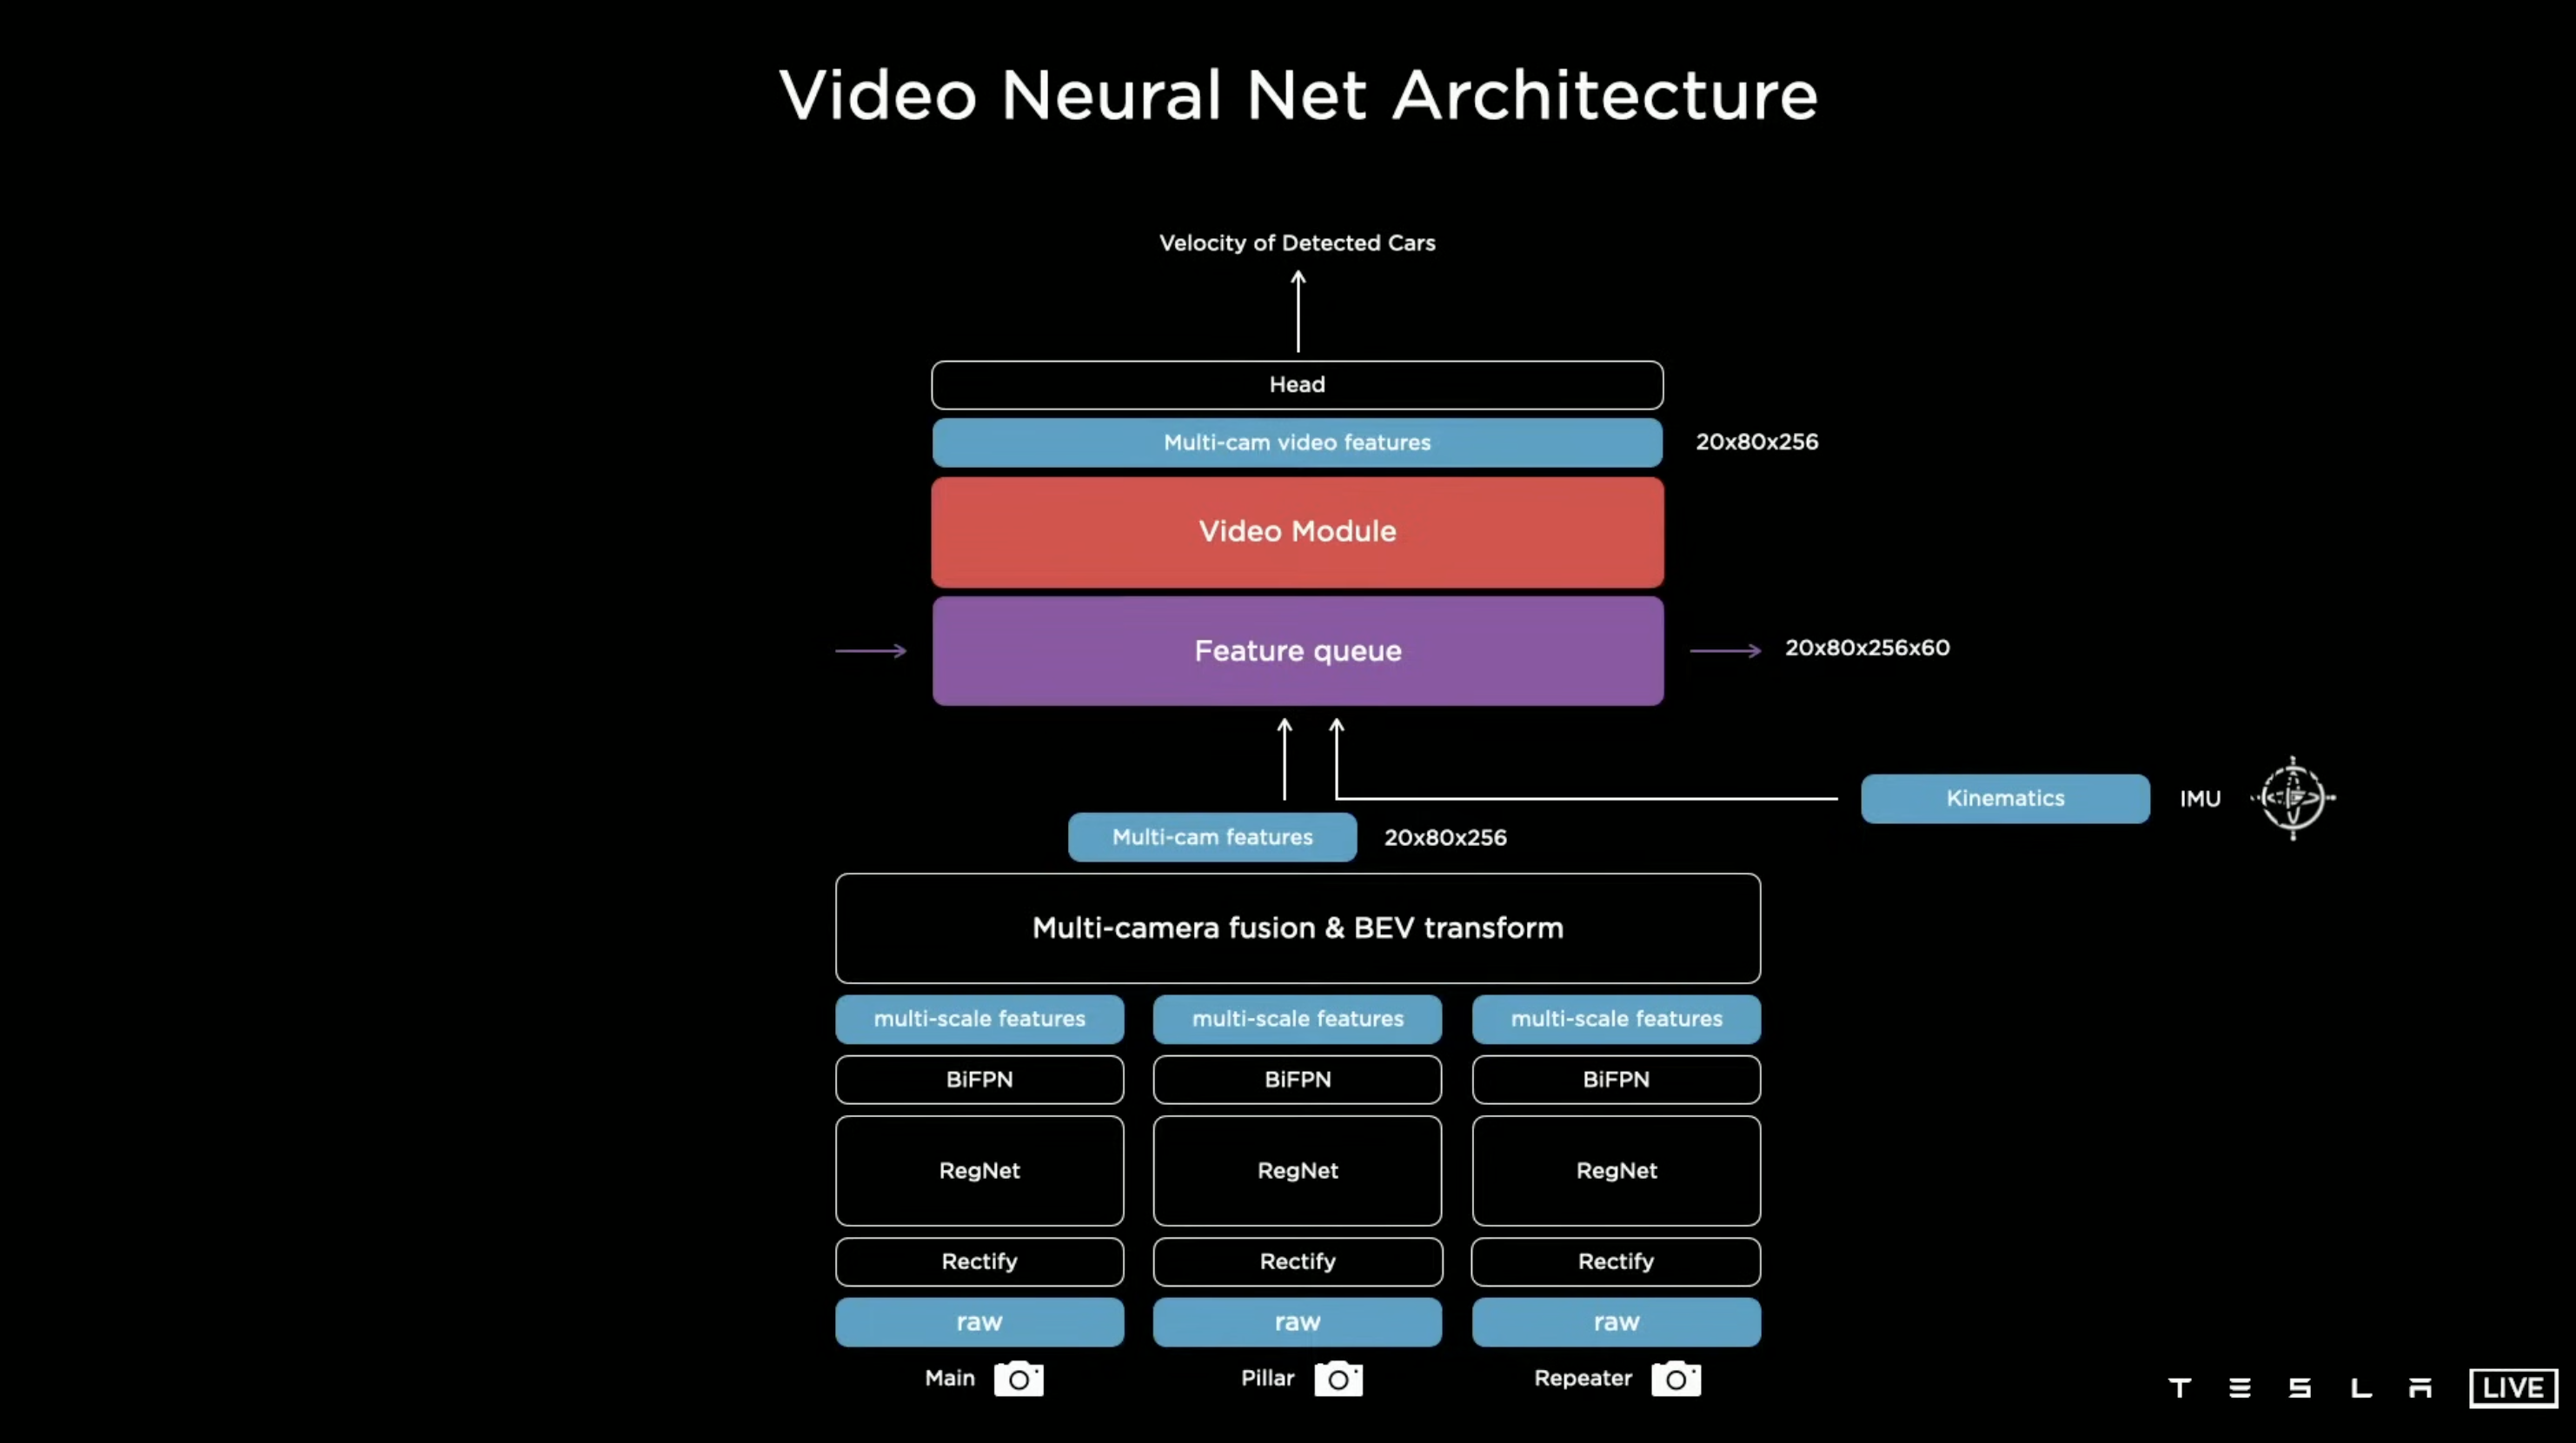
I found, SAM3 looked kinda similar to the things Andrej Karpathy was talking about in his talk in Tesla Tesla AI Day 2021 [11].
References